

In this post, I am going to examine several issues related to using tables on your SchoolMessenger web pages. First some Do’s and Don’ts.
Do’s
- Use tables to display numeric or alphanumeric data
- Provide a table title or caption to identify the table especially when referenced from accompanying text.
- Provide a single header row to define the data in each column
- Associate the data cells in the table after the header row with the corresponding header.
- Minimize colors in a table to what you need for branding or to highlight headers and/or totals. Banded rows use different background colors to help visual readers track information across the table.
- Use tables to augment the data used in a graph for those visually impaired.
Don’ts
- Never use a table in a web page to define content areas. Screen readers may not work properly with these structures.
- Never fix the table width in terms of a number of pixels.
- Never fix the column width in a table using a number of pixels.
- Never use a table to display only a single column of information.
- Never split or merge cells within a table as this also confuses screen readers
Making a Table
When creating content in your SchoolMessenger site, you should add a table directly to the content area by clicking on the Table button in the edit toolbar of the Content portlet. First position your cursor where you want to place the table. Then when you click the table button, a dropdown appears that lets you visually define the size of the table in terms of columns and rows by dragging your mouse through the grid of squares.
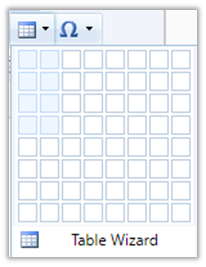
This does not mean that you cannot change the size of your table later adding more rows or columns. It merely defines the table size to get started. Additional buttons under this dropdown’s grid allow you to customize a table by adding rows and/or columns and well as deleting rows and/or columns. Also, if you are in the rightmost column of the last row of the table and press Enter, the editor will add a new row to the bottom of the table.

There are also some features that we do not recommend using because they can break ADA compliance due to screen reader issues. These features are found on the second row of buttons in the table dropdown and allow you to merge or split cells. However, the last button on the bottom right of the second row is the Table Properties button. Click this button to open a dialog that contains four tabbed pages as defined below:
Table Design – This page of the Table Properties allows you to add or remove rows and columns to your table as well as merge and split cells. However, I prefer to perform these actions using the other buttons in this dropdown.
Table Properties – This page lets you control the overall appearance of the table. The most important point on this page is to never restrict the table width to a fixed number of pixels. This prevents your table from being responsive to different screen sizes.
Cell Properties – This page lets you control the appearance of individual cells. Again, never restrict the cell width (and thus the column width) to a fixed number of pixels. This will reduce the degrees of freedom a browser has when resizing a page for different screen sizes or orientations.
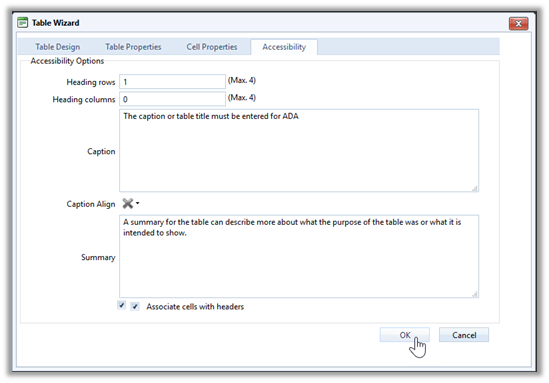
Accessibility – This page is lets you define all the attributes needed to make a table accessible. The most important are:
- The number of Heading Rows should be: 1.
- A caption (or Title) for the table must be present.
- All cells in the table must be associated with their appropriate headers.
A final attribute, Summary, can provide a description of the table content that users of screen readers can listen to after hearing the table title/caption.
Making Tables Responsive
A responsive table merely means that the table automatically resizes to fit the dimensions of the device being used to display the table. By default, HTML tables are responsive as long as the width of the table as well as the columns are not associated with a fixed number of pixels. If a table has a fixed width for the overall table or for individual columns, you should consider removing these constraints.
Making Tables Accessible
Making a table accessible is not the same as making it responsive. A responsive table can still fail the accessibility test. To make a table accessible within SchoolMessenger is easy. All you need do is edit the portlet containing the table, click in any cell of the table and select the Table icon from the edit menu bar. Then select the Table properties button to open the Table Wizard.
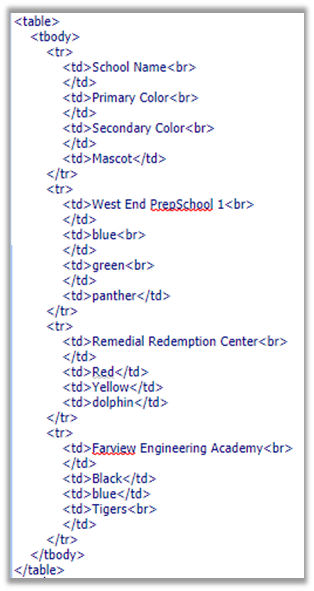
As an example, suppose we start with a simple table as shown in this figure:

Note that the table consists of a single row at the top that defines the contents of each of the table columns. These cells are referred to as the table headings. To be accessible, you only want a single row defining the column headers. The text can wrap within each cell, but it cannot extend across multiple rows.
By choosing the HTML tab along the bottom of the editor screen, you can view a listing of the sample table code before making the table ADA compliant. The following figure shows this code:
While you can directly edit the HTML code to make the table accessible, a far easier method uses the Accessibility tab of the Table Wizard (or Table Properties button). From this page, you can easily make the table accessible by defining the number of header rows, the caption, and associate cells with their headers as shown in the following figure.
After saving these accessibility properties, you can again view the HTML of the table to see the additional code that has been added to make the table accessing. The following listing displays the code of the same table with the ADA additions highlighted in yellow.
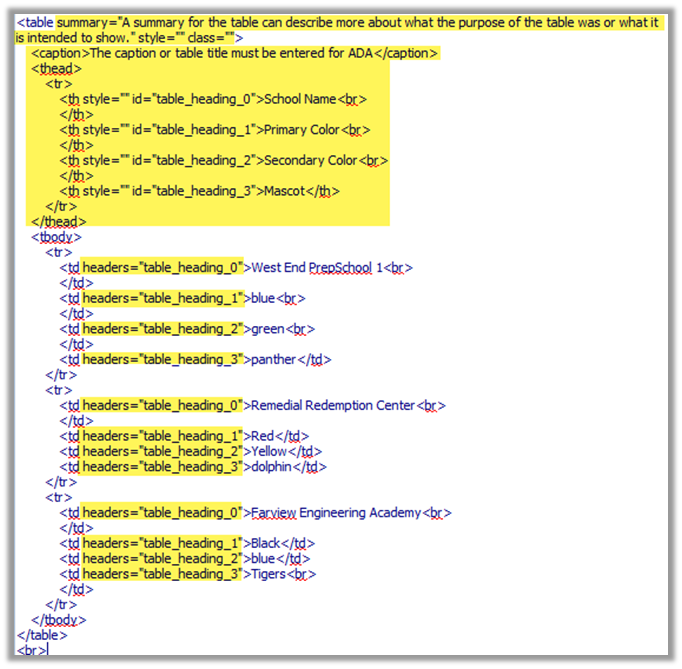
Clearly, making all of those changes manually would be far more difficult than using the table properties but not impossible. It is interesting to note that while building a table in Microsoft Word, the Table Properties dialog has a similar tabbed page named: Alt Text. However, this dialog does not allow you to define the number of rows a header has or how to align the caption/title or whether cells are associated with the corresponding column headers. Furthermore, this information does not get carries over when you attempt to copy and paste the table into your web page from MS Word.
If you previously pasted a table from Word, you can click in any cell and then using open the Table dropdown menu from the Edit ribbon and click on Table properties to access the Accessibility tab as described above. However, remember that pasting directly from Word carries with it all of Word’s formatting making it difficult to override any text properties of the content within the cells. Furthermore, if you add rows or columns to the table from within the content portlet editor after pasting the initial table, these additional rows and columns will not be formatted like the rest of the copied Word table leaving it up to you to figure out how to fix the formatting.
The net result of all this is that you should create tables from within SchoolMessenger’s content portlet. Do not attempt to copy a table from somewhere else. Then format the table within SchoolMessenger’s content editor and finally set the accessibility attributes as described above.