

Now that you have a Word Document that is accessible, how can you create a PDF that you can distribute to others outside of OCPS.
Since the 2007 version of Word, you have had an option to change the file type when you save a document. In the Save As dialog, you could open the Save as Type dropdown (shown below) and select PDF to save the current document as a PDF file instead of a Word document (.DOC or .DOCX).

Unfortunately, this option strips out the accessibility features from the document while creating the PDF file from the modern .DOCX Word format files.
The preferred option, as long as you are using a computer from OCPS, is to use an application installed on your computer called Adobe Acrobat DC which hooks into most Microsoft Office applications as well as being able to run as a standalone application. We touched on this application in the post that discussed ways to check your document for accessibility issues. (https://wordpress.ocps.net/presenceblog/checking-the-accessibility-of-your-documents/)
From within Word, open the document you want to convert. Notice that Word’s main menu includes a ribbon tab called ACROBAT.

Open this ribbon and click on the first icon, Create PDF, to create an accessible PDF from a Microsoft Word 2007 through 2016 document.
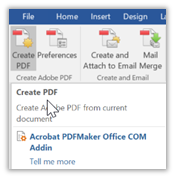
You can accomplish the same thing by opening the File menu which shows the Microsoft Backstage options and select: Save as Adobe PDF from the menu in the left column.
If you use a non-OCPS computer that does not have Adobe Acrobat installed, you can follow these steps to create an accessible document.
- Open the Word document as you normally would
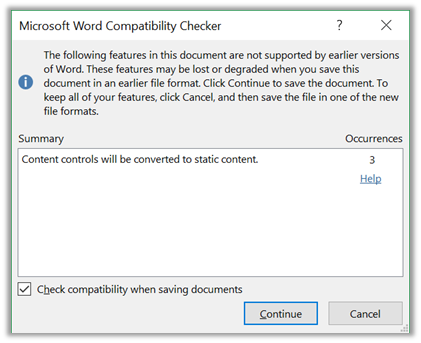
- Immediately save the document with a different name using the Word 97-2003 document file type (.DOC). You may get a message from the Microsoft Word Compatibility Checker indicating that you could lose some features when reverting to an earlier file format. For now, click Continue. However, you will want to compare the resulting document with your original (that is why you saved this version with a different name, right?).
-
- With the ‘converted’ document still open, save the document a second time but this time select the Save As Type: PDF (see the first image in this post).
- Before continuing with the save, click the Options button and make sure the following options are selected:
- Document Properties
- Document Structure tags for accessibility
- Bitmap text when fonts may not be embedded
- Publish as document
- Finally, click OK to save the PDF version of the document that should retain most of the accessibility functions.
If you read my previous posts, you may remember that there may be some issues with Alt-text on links and images. There is nothing you can do about ‘missing’ alt-text from embedded images other than making sure that the text above or below the image fully describes the image. Similarly, you can make sure that all link text includes enough information to fully explain the purpose and actions of clicking on that link. Other accessibility features appear to come through.
Of course, this recommendation could change as new browser versions more fully support accessibility from PDF files as well as the PDF files themselves being able to include accessibility information from their source documents.
So, in summary, the posts you need to understand the basics of document accessibility include the following:
- https://wordpress.ocps.net/presenceblog/the-new-508-compliance-rules-for-2018/
- https://wordpress.ocps.net/presenceblog/link-colors-and-color-contrast-for-ada/
- https://wordpress.ocps.net/presenceblog/closed-captioning-its-not-an-option/
- https://wordpress.ocps.net/presenceblog/hyperlink-colors-part-2/
- https://wordpress.ocps.net/presenceblog/frequently-asked-questions-about-accessible-images/
- https://wordpress.ocps.net/presenceblog/accessibility/
- https://wordpress.ocps.net/presenceblog/accessibility-of-images-in-pdfs/
- https://wordpress.ocps.net/presenceblog/tables-have-accessibility-requirements-too/
- https://wordpress.ocps.net/presenceblog/checking-the-accessibility-of-your-documents/
- https://wordpress.ocps.net/presenceblog/hyperlinks-in-documents/
- https://wordpress.ocps.net/presenceblog/creating-your-accessible-pdf-from-word/
Doing everything you can to keep your pages accessible is not just a district recommendation; it is a legal requirement for the district. If you have questions about ADA compliance feel free to contact us at: presence@ocps.net and we will either answer it or forward your question to the legal department for their interpretation of the rules.