

Goal: To create two links under School Information that will represent:
- A link to the current version of your school newsletter
- A link to a page that contains an archive of school newsletters using a document container.
To begin:
- Open your school site in your favorite browser.
- If you are not logged in, click Login in the top bar of your school site’s page and login in with your employee ID and password.
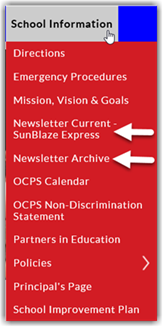
- Click on School Information in the site’s Main Menu. Remember that pages are built in a hierarchy.
Create an External Link for the Current Newsletter Document
-
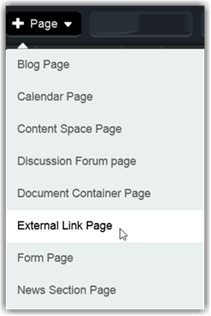
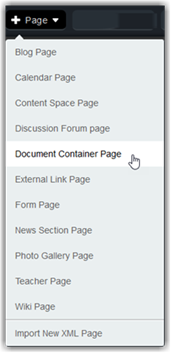
From the Editor’s Menu, select +Page to choose the type of page you are adding under School Information. In this case, I will show how to create a link to a PDF file where the file is stored in the school’s File System. This type of page calls for an External Link Page.
-
Click on External Link Page.
The New External Link Page displays.
-
Enter a Title for the Current Newsletter page. We recommend the format: Newsletter Current –
<Newsletter Name> where you replace <Newsletter Name> with the name of your school newsletter if it has a special name.
-
Click the Blue arrow to the right of the title to copy it to the Name field or simply type Newsletter_Current as the name of the newsletter page to keep it short.
Note: Name is used to define the page URL which should be unique, but short. However, Title is the name that appears in the menus for the user and can be more detailed.
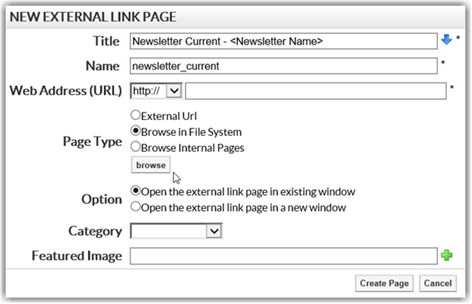
Select Browse in File System as the Page Type. Then click the Browse button.
Upload the current newsletter as a PDF file. I recommend that you previously name the newsletter file on your local system as Current Newsletter.PDF. Why not name the newsletter with the month and year? If you do that, the link must be changed monthly. If you use a generic name for the current newsletter, you only need to upload and replace the old newsletter with the new one.
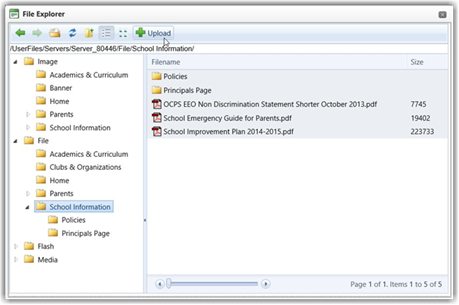
The Browse button from the prior screen displays the File Explorer dialog. Navigate to the School Information folder within the File folder. (Do not add PDF files in the Image folder.) Then click the Upload button in the menu bar at the top of the dialog.
The Upload dialog allows you to enter the name of the file you want to upload. It must include the full path to the file. This is probably not the preferred method to enter the filename. A better choice is to click the Select button to navigate to and select the newsletter file.
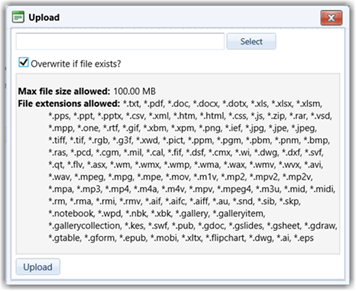
Note: if you are uploading a newsletter for any month other than the first month, you will want to check the Overwrite if file exists option checkbox. Every month after the first month, you will upload the most recent newsletter using the same filename.
Why? So that you do not have to change the link in the External Link Page.
This will save you many steps in future months.
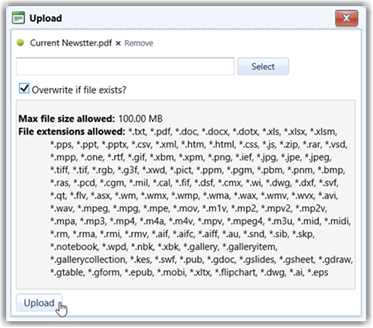
After you have identified the file to be uploaded and it appears at the top of the Upload dialog as shown in the next figure, click the Upload button in the lower-left corner of the Upload dialog. If you selected the wrong file to upload, click the Remove link to the right of the filename.
After clicking Upload, the file appears in the File Explorer menu. Double click on the newly uploaded files to select it as the external link URL.

In the New External Link Page dialog, you should now see the link to the file. Make sure to select
https:// as the prefix to the URL.
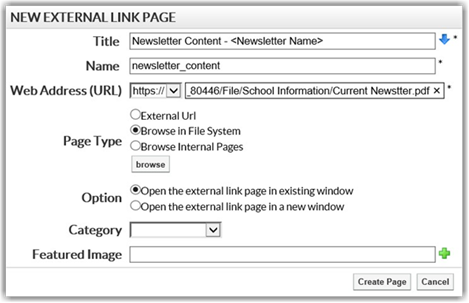
We do not currently use the Category or Featured Image options at the bottom of this dialog. Click the Create Page button in the lower right of the dialog to complete the definition for the New External Link Page that when selected opens the current newsletter.
In subsequent months, upload the new newsletter PDF file to the same location in File à School Information folder using the same name filename.
Creating and Supporting the Newsletter Archive
- Open your school site with your favorite browser.
- If you are not logged in, click Login in the top bar of your site’s page and login in with your employee ID and password.
- Click on School Information in the site’s Main Menu.
If you have not yet set up the Newsletter Archive
- From the Editor’s Menu, select +Page to select the type of page you are adding under School Information.
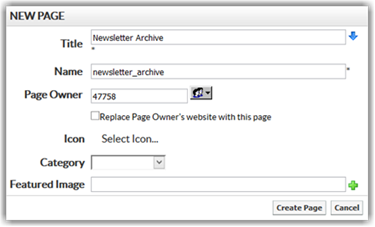
- Click on Document Container Page.
- Enter as the page title: Newsletter Archive.
- Click the blue arrow to the right of the title to create the page Name property.
- Click Create page to continue.
On the Newsletter Archive page, you will see an empty document container with a menu across the top of it.
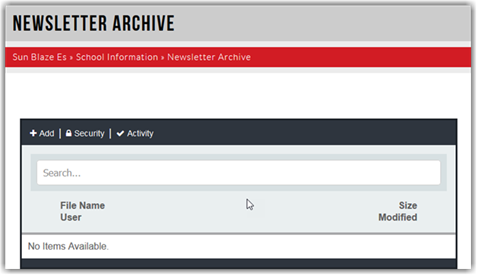
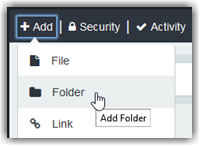
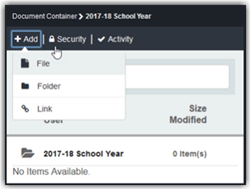
Click Add from the menu to display the options of what you can add.
If you do not have any folders yet, you need to first create a folder for the current school year.
If you have a folder for the current school year, you can skip this section and go to Adding a Newsletter to the Current School Year Folder.
Adding a folder
- Click the +Add button (if you have not already) in the header of the document container.
- Select Folder from the dropdown menu.
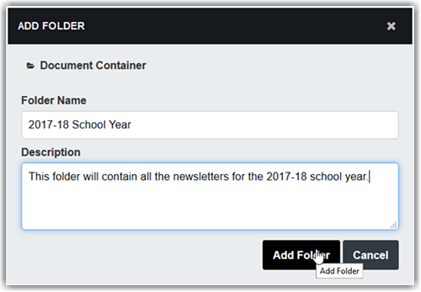
- Provide a folder name. We recommend starting with the school year as in the image shown below.
- Add an optional description which can also contain other information about your newsletter such as the current year’s editor, when the newsletter comes out (first Monday of the month), or other information.
- Click Add Folder when you are done.
Adding a Newsletter to the Current School Year Folder
- Open the Newsletter Archive page and click on +Add in the header of the document container.
- Click on File in the dropdown menu.
Note: At this time, you do not need to worry about which folder the newsletter should be inserted into. We will do that as a separate step below.
This opens the Document Container and allows you to add files by dragging them from a second window using Window’s File Explorer or you can click the Add Files button in the lower left of this dialog. Unless you are adding historical newsletters from prior school years, you will probably only be adding the most recent newsletter file. Know, however, that the Document Container can be ‘filled’ with multiple files at one time if they all reside in the same folder or any folder to which you can point Windows File Explorer.
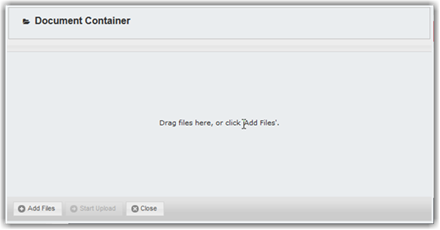
You can select a document either by dragging it from Windows File Explorer or by clicking on the Add Files button. The drag option may only work with selected browsers, so do not be surprised if you must use the Add Files button. The key advantage of using the drag and drop method is that it is generally faster to find and drag your files even multiple files than other methods.
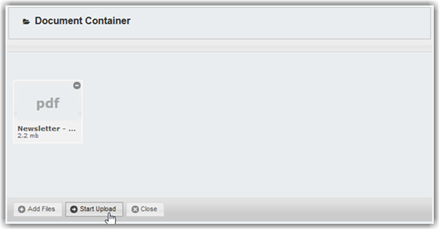
As you add one or more files to the document container, each will be represented as a tile as shown in the above figure that identifies the file type, the beginning of the filename, and the size of the file. When you are done selecting which files you want to upload and placing them in the Document Container, click the Start Upload button. If you click the Close button first, you will not upload your selected files and you will close the document container dialog forcing you to start over. Only click the Close button after you have uploaded your desired files or to cancel this action.
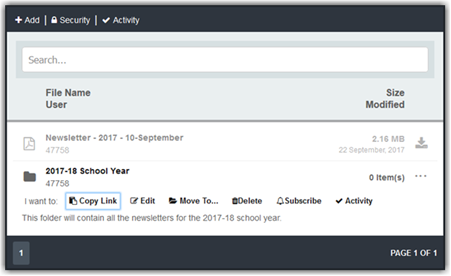
You will notice that initially, the uploaded newsletters are at the same hierarchy level as the folders. In fact, there is no current way to first select a folder and then directly load a file into that folder. However, moving the uploaded files into the correct folder is quite simple. Simply click in the row representing the newsletter you want to move. Notice the options that appear beneath the filename. Choose the Move To option to open the MOVE TO dialog as shown in the following diagram.
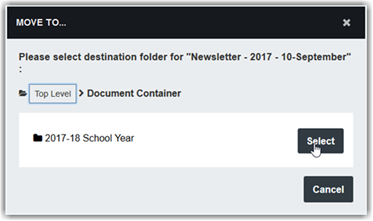
You can select the school year folder by clicking the Select button to the right of the correct folder name. If you have folders within folders, you can drill through those folders to the desired level where you want to locate the file you are moving.
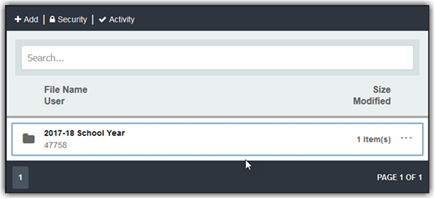
That is all you need to do to create and maintain your newsletter archive. Each month you can open the Document Container, as shown above, upload the current newsletter and then move it into the appropriate folder for the school year.
Where are archived newsletters stored? They appear to be stored with the document container in the page definition. They are NOT stored in the File Manager. Therefore, any editing or deletions of uploaded files must be done through the options in the Document Container itself.
Retrieve a Newsletter from the Archive
To help users of the archive, you may want to consider adding text above the Document Container as shown in the following image providing a clear set of steps on how to navigate to the desired newsletter and select it.
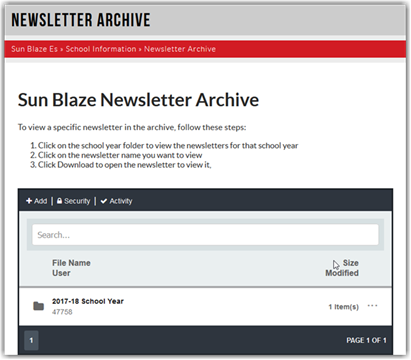
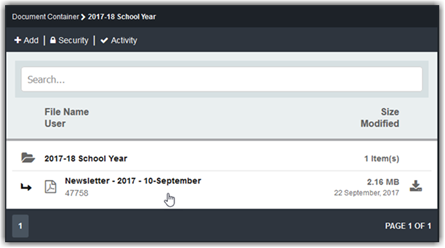
Most visitors to your site only need the ability to open and read the newsletter. Therefore, when they navigate to the site, they can click on the school year folder they want and then click on the newsletter they want. Notice in the following image, you can make it easier to identify the newsletter the user wants by defining a newsletter filename that is formatted as:
Newsletter – <Year> – <Month #>-<Month Name>
Using this format keeps all newsletters together, even if other files are added to the Document Container and orders the files based on which metadata column they click on.
If the Document Container gets filled with other documents, the careful naming of each file as described above becomes increasingly beneficial. Regardless of the sort order selected or the naming convention, the site visitor can search the document container for a specific file by typing in a search word or phrase in the Search box at the top of the dialog to find the file they want.