

So now that you have created your Word document, how can you check if that document is accessible? There are many accessibility checkers available on the Internet. However, did you know that you have an accessibility checker built right into Microsoft Word? I’m sure most of you did not because I did not either until I began work on this series of posts. Furthermore, it is easy to use and it often helps you to fix any issues it finds. Let’s take a look at a ‘randomly’ selected document from the Internet.
I found a document named: Executive and Resource Manager Training for Project Server 2013. This was an internal document, but that does not matter because anyone can submit an accessibility complaint. The documents do not have to be public facing. I will not reveal the author or department of this document, but will use it as a typical example of a document you might see. In this case, the document was already a Word document with a .docx extension. Had it been a .PDF, I could use Word to open the file and attempt to convert the document back into a .docx style document. However, it is always better to begin with the original document.
After opening the document in Microsoft Word, click File in the main menu. If the Info section is not selected, click on Info in the left menu. The Info section displays a series of buttons. Look for the one labeled: Check for Issues. The text to the right of it should begin with the header: Inspect Document.
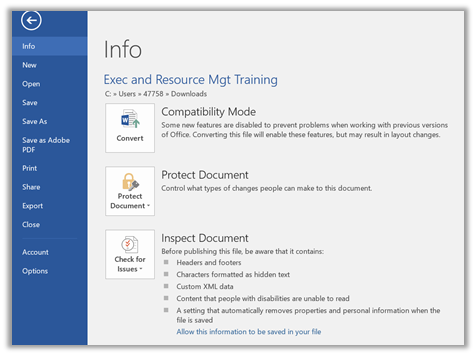
Note the small down pointing arrow after the word Issues on the button. This indicates that there is an additional menu under this button. Click on the Check for Issues button to display the submenu.
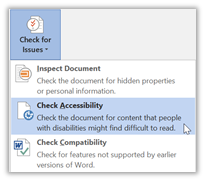
In this menu, you will find the Check Accessibility option. Click on it. Word returns to your document and opens a panel on the right side titled: Accessibility Checker. This panel has two sections: Inspection Results and Additional Information. In the Inspection Results section, the checker lists all the accessibility errors and warnings it has found. Errors are accessibility issues that you must fix for a document while warnings are suggestions. The Tips section at the bottom of this list are items that the checker cannot verify but suggests that the document creator review before publishing the document. For each issue that it finds, it includes the number of occurrences of that issue in parenthesis.
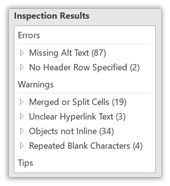
Note that this document has nearly 90 errors and another 60 warnings. To locate individual errors, open the error category by clicking on the carat to the left of the error category.
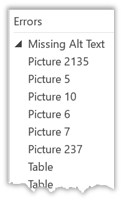
As you can see, the accessibility checker catches images and tables without alt-text. But where are these individual instances? What is Picture 2135 or Picture 5 and where are they in the document? By double clicking on an error, the Accessibility Checker takes you directly to the object in the document and selects it for you.
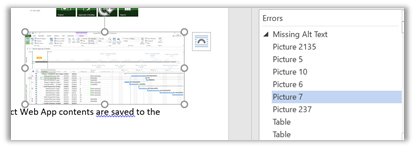
Now with the object having the accessibility error selected, take a look at the Additional Information section in the right panel to see why you need to fix the error and how to fix it.
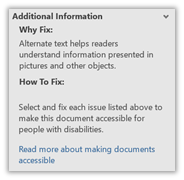
This error is easy to fix if you read my past post on adding alt-text to images. All you need do is right click on the image, select Format Picture, select the Layout & Properties menu and then open the Alt Text properties.
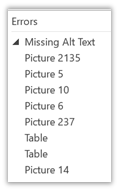
After adding the alt-text for ‘Picture 7’, notice that the Accessibility Checker automatically updates by removing this error from the list as shown in the following figure that now goes from Picture 6 to Picture 237.
In a similar fashion, you can work your way through the rest of the errors and warnings to create a final document that satisfies all the accessibility requirements.
Does that mean that this Accessibility Checker will solve all of your ADA issues issues? Unfortunately, not yet. For example, it would not know the difference between the alt-text of ‘picture’, ‘abc’, or ‘Image of the Project Professional screen with a sample project displayed.’ All it really looks for is whether the alt-text field has something in it. You are still responsible for determining appropriate alt-text.
However, Microsoft Word’s Accessibility Checker will at least get you started thinking about and addressing accessibility issues before creating your PDFs. Let me just give you a few additional caveats before finishing this section. Word’s Accessibility checker will not:
- Check documents already saved as a PDF
- Check documents for color contrast compliance
- Check documents to find text embedded in an image
- Check documents saved as blog posts rather than documents
So how can I check the accessibility of a document that already has been converted to a PDF? Fortunately, OCPS has made available Adobe Acrobat DC on all district computers. While most of you may only think of this tool as an add-in that allows you to view PDF files, it too has an accessibility checker.
From file explorer, double clicking on any PDF file attempts to open it using Adobe Acrobat DC. After opening the PDF, you will see a list of tools on the right side. If the Accessibility tool does not appear in the list, you can easily ad it by clicking on the Tools menu item found on the top left side of the window.
Then click Accessibility to start the tool. The menu options in the right panel change to the following:
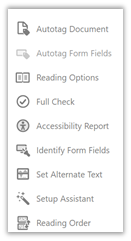
Click the Full Check option to run a full scan of the current document for all accessibility issues. This option opens the Accessibility Checker Options menu (not shown here). I most cases, you do not have to make any changes to the options other than perhaps the location where it saves the physical copy of the report. Then click the Start Checking button at the bottom of the dialog.
Whether you create a separate report document or not, the checker, opens a panel on the left of the document that displays the areas checked along with a count of the number of issue types. To see the details, you have to click on the small square (with the plus sign) to the left of the issue area to expand it. Then from the list of sub-issues, you can see which items passed and which failed. For those that failed, you need to double click to open a list of the instances. One issue can have dozens of instances as shown in the following image.
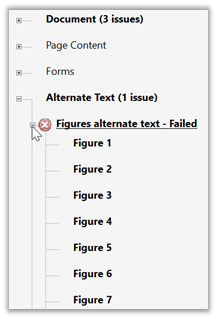
Clicking on any instance shows the location of the error in the document while right clicking on the instance displays a dialog of options that explain the error further and in some cases such as Alt-text, how to fix the error by supplying alt-text and saving it in the document.
However, you cannot fix all accessibility issues in the Adobe Acrobat PRO DC Accessibility Checker. For many errors, you will need to go back to the source document. Additionally, some of the errors are not as clearly listed or even found at all here compared to Microsoft Word’s Accessibility Checker. For that reason, I prefer to run documents through the Word’s Accessibility Checker fixing errors there before creating the PDF document.
You will need to work with both of these tools for a while to get comfortable with using them. However, if you create your document in Microsoft Word and then spend the time checking the accessibility of your document from within Word, your next step will be to generate a distributable and accessible PDF. Next time, I will cover ways that you can generate your PDF from Microsoft Word and a few ways that will not generate a properly accessible PDF file.