

Today’s post is just a brief reminder that all links must have reasonable alt-text to help vision challenged visitors to our sites navigate with the existing links. It will discuss two basic types of links: Page/document links and Email links.
Page and document links take a user to either another page within the same site, a different site still within OCPS, or a site outside of OCPS or they reference and open a PDF document. The tooltip property (which actually gets stored in the Title property of the link’s HTML), must emphasize that by clicking on the link text, the application will take the user to another page in either the same window or a new window. To support consistency, there are some wording suggestions for links:
All links should begin with: “Click here to open” or “Click here to go to”.
Links that go to a PDF or to a page/site outside of OCPS must open a new window. Therefore, the link text should include the phrase: “in a new window”. Opening a page outside of your site (department or school) can optionally open in a new window or the same window. Opening another page within your site (department or school) should open in the current window.
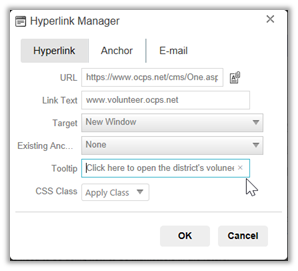
To enter or update the tooltip for a link, first edit the content portlet containing the link. If you right click on the link, you should see the properties of that link at the bottom of the dialog (see next image). In this case, note that the tooltip link (Title property) merely said: Link. This text is not adequate to meet accessibility standards. In this case, since the Target for the link is: _blank (which is a new page), an appropriate tooltip text might be: Click here to go to the OCPS Volunteer page in a new window. We want to emphasize that the next page opens in a new window so that the vision challenged person knows that they can simply close the window that the linked information opens in to return to their current page.

If you do not like working in the properties at the bottom of the edit dialog, you can right click on the link to open a dropdown list of two options. Click Properties in this menu to open a dialog specifically for this link.

In the Hyperlink Manager dialog, you can select the Target for the display of the new information to be the Same Window or a New Window as shown below. Also, you can type the tooltip text in a textbox with the label: Tooltip.
The next line in this page’s content area lets the user click on a link to open their email application to send an email to the person specified. However, the Hyperlink Manager dialog that lets you define the email link as shown below, does not provide a field for the tooltip. I’ll get back to that in a moment.
First, I want to offer a suggestion for email addresses that are really more to a position than to a person. In this case, a better choice than specifying the email of an OCPS employee in the link text (which is what appears in the document) would be to change this content line to say: You may also email our ADDitions coordinator and select “ADDitions coordinate” as the link text. Then instead of using an OCPS employee’s email (which could require frequent updates as people change positions), request a generic email address such as: ADDitionsCoordinator@ocps.net from ITS. Then the person(s) assigned to this email address can be easily changed by the person who owns the generic email address or by ITS. If this email address appears on multiple pages or in multiple content areas, this also simplifies updates to the email address by only needing to make the change in one place rather than (n) locations where (n) might not even be known.
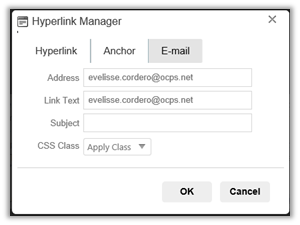
As seen in the image above, the Hyperlink Manager displays properties that define the address for the TO: field of the email, the link text displayed in the content, and a Subject text box that can optionally define a subject for the email. For example, for this page about volunteers, an appropriate subject might be: Re: Volunteer Information.
Note: Never make changes to the CSS Class field.
To create a tooltip for an email address, you must use the other method for providing the text by right clicking on the text that will serve as the link and using the property fields at the bottom of the Edit Page Content dialog box as shown below. Enter the text in the Title field. Again, it should begin with something like: Click here to email followed by the name of the person (not their email address again) or the position title.

When done, remember to publish the changes to your content portlet.
Next time, I will explore the proper use of the Heading X style where X is a number beginning with 1.