

At a recent Open Lab, the question came up as to why we cannot add captions at the bottoms of all images. Perhaps they are thinking about captions that appear beneath images in many books and magazines. Or perhaps they noticed that captions are available at the bottom of the rotating banner images for both the main OCPS district site as well as the home pages of our schools. They may also have noticed that there are no options to add captions for images placed in other locations within the web such as images insert into content web parts.
Currently, when you add an image to the image library directly, the File Manager dialog that opens when you select File Administration from the black menu bar does not prompt for any additional properties much less Alt Text or ToolTip text. One reason is because the basic file/folder structure does not support those meta data features. Fortunately, most web admins and authors do not have the ability to upload images or documents through File Administration. Another excellent reason is that an image or document could be referenced from multiple pages and you may want a different line of text associated with each instance where that image is used.
However, when an author/admin is working from within a web page and wants to add an image, SchoolMessenger uses a slightly different dialog to both select existing images already stored in the system and to upload new ones. In the process of selecting an image to be used in the web part (even if you just uploaded a new image) the dialog prompts for additional information such as size, alt text, etc. The key point to understand here is that this information is not stored with the image. Even if you specify different dimensions for the image, that information does not physically change the size of the image as stored. It merely resizes the image when placed on the page. Similarly, text added as alt text is merely added to the HTML ‘alt’ attribute that is built by the dialog to display the image.
For example, suppose you were editing the content on your web page and selected the Image Manager as shown here:
The Image Manager opens the Image Manager as shown below. You start by navigating to the folder where the image was stored or where you want to upload the image. Note that the Image Manager does not know what page of the portal you are in and will not automatically take you to the appropriate folder. You must navigate to the correct folder (or create a new folder) first. When you click on the image name in the second column (for previously uploaded images), a preview of the image appears in the right column. Well actually, the preview only works for .jpg and .gif images files, not for .png files.
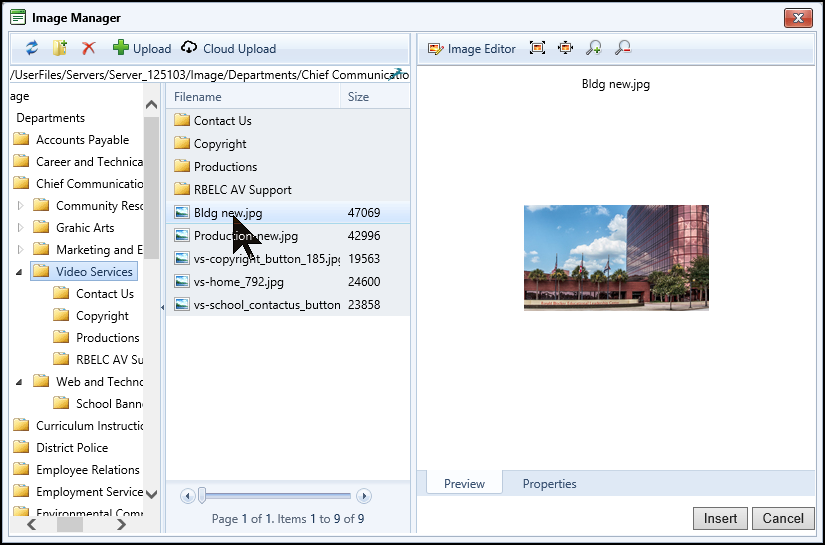
In any case, you should see two tabs at the bottom of the right column, Preview and Properties. If you click on Properties, you will see the other properties that can be set for this instance of the image to be used on the current page you are editing. Remember that these properties are only used for the current instance of the image and are not saved with the image file itself.
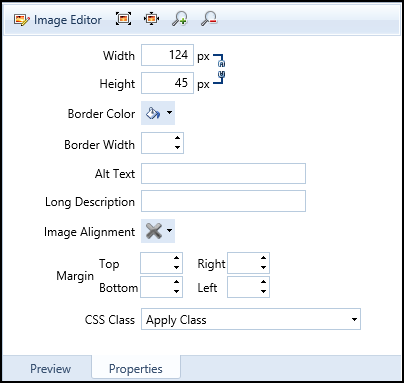
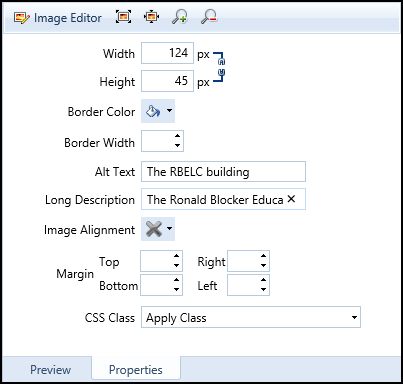
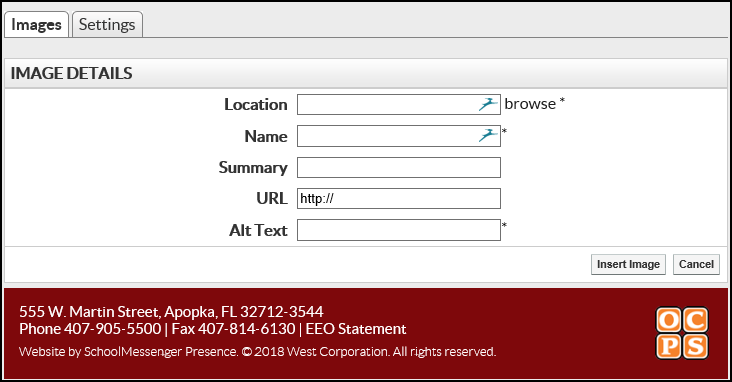
The properties that I’m going to focus on are the Alt Text and Long Description properties. If you enter text into either or both of these properties, the text is added to the HTML that displays the image. The important property for ADA compliance is the Alt Text property. In fact, you cannot click the Insert button to insert the image into the page without filling in some text in the Alt Text field. This text should be meaningful because it is used by screen readers for the visually impaired users of the web. The text must describe the important aspects of the image to those users, not just say, ‘Image’. In fact, one way to determine if your text is meaningful is to close your eyes and say the alt text words to yourself. If the words do not form a mental image in your head, then the text needs to be revised. The Long Description is optional and may or may not be read by all screen readers. Suppose we had the following entries:
When we insert this image into the page, and the user hovers over the image they will see the Alt Text in a rectangle which many people refer to as ToolTip text (because that was the origin of this feature).
However, the Long Description text does not appear to the user. It is part of the HTML as shown by the following segment of code from this page as part of the ‘longdesc’ attribute of the <img> tag. Note also that the Alt Text defines both the ‘title’ and the ‘alt’ attributes. All three of these attributes are part of the <img> tag and therefore are clearly associated with the image.

This is how screen readers associate the alt text with an image to describe it the visually impaired.
So how is this different from images in rotating banners? Let’s look first at the school rotating banner web part. If you have rights to edit your school web site and you enter Design Mode you will be able to select images to be part of the rotation by using the first dialog when editing the banner web part and clicking the Add Image button.
This display the Image Details dialog for specific image. Each image added to the banner has its own set of image details.
To select an image, click the Browse option. This opens the same Image Manager dialog that we saw above allowing you to select from a previously uploaded image or to upload a new image. Also as before, to leave that dialog you must supply an Alt Text string. Suppose we selected an image and provided an Alt Text string and clicked Insert to add the image to the current page. The Image Details dialog as shown below updates with the information from the Image Manager. If we leave the Summary field blank, the image appears as follows:
However, if we add Summary text in the dialog as shown here:
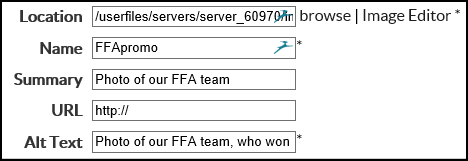
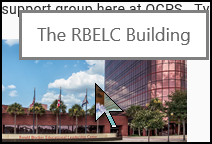
The Alt Text appears when the user hovers their mouse over the image while the Summary text appears as a caption at the bottom of the image as shown here:
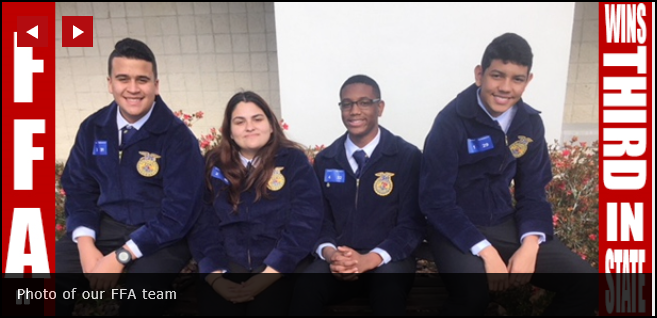
Notice that the image is not resized when Summary text is used. Therefore, the lower portion of the image will be covered. We have also determined from our contacts with SchoolMessenger that screen readers do not associate the Summary Text with the image even though it appears to be selectable with your mouse. Therefore, this is not a valid alternative to using Alt Text with your images.
For those interested, Summary Text appears as a separate HTML element because there is no corresponding attribute in the <img> element for this information.
<a onclick=”GoNextSlide('ctl00_ContentPlaceHolder1_ctl09_divView',6)” title=”Industry Inspire Night” style=”display:block;”>
<img title=”#f863a7ea90264e1eaad7224d2549b979″ src=”https://p15cdn4static.sharpschool.com/userfiles/servers/server_70176/image/industry%20inspired%202017%20015%20-%20alecia%20sharpe.jpg” alt=”Industry Inspire Night” />
</a>
<div> id=”f863a7ea90264e1eaad7224d2549b979″ class=”nivo-html-caption”>
<p>Industry Inspire Night</p>
</div>
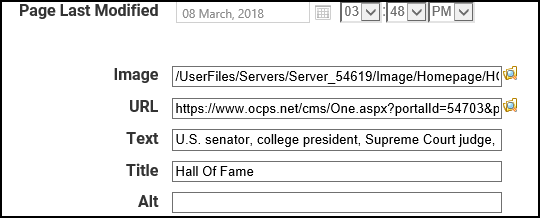
For the district home page, the rotating banner web part has a slightly different dialog (shown below) which includes the image URL, the on-click URL, Title, Text and Alt. The difference between this dialog and the one used by the rotating banner at the schools is that instead of calling the caption field Summary Text, it is just called Text here. This text also covers the bottom of the image as did the Summary Text in the School rotating banner, but the background is a solid grey rather than a semi-transparent black. In either case, information at the bottom of the image will be covered.
Another word of warning. Some browsers will take the text from the Title field if there is nothing in Alt (remember the Image Manager put the tooltip text in both the ‘alt’ and ‘title’ HTML attributes for images on a content page). However, because not all browsers (or versions of browsers) do this, you should still always use the Alt field even if it is just a copy of the Title field.
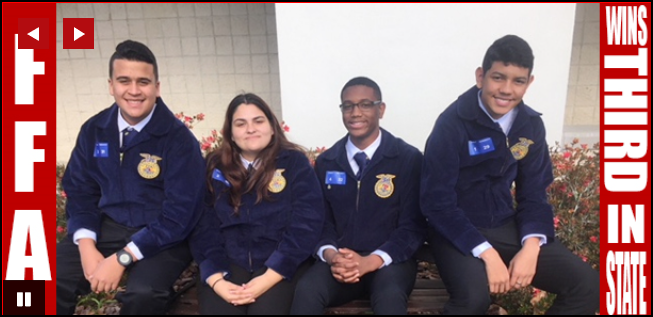
Finally let’s look at a bad example. Suppose you decide rather than use ToolTip Text or Summary Text with your banner image that you simply included the text in the image itself such as the example below:

For most people with ‘good’ vision, this may appear to be fine. However, screen readers will not read the text at the bottom of the image. In fact, they don’t read any text within the image. If we look at the image properties, we can see that the text, ‘Click here for more information’ was not created by Summary Text, and is different from the Alt Text.
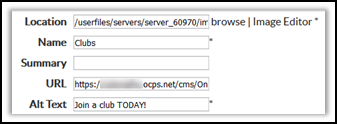
Therefore, for the visually impaired viewer, they may not know that they can click on the image to get more information about the clubs at this school. Perhaps a better Alt Text value would be: “Click here for more information about joining a club”. Remember that just adding Summary Text to a banner image is not adequate either because summary text is not read by screen readers.
Does all of this mean that you cannot add a caption to images that are not in a rotating banner? Of course not, but that text would be just normal text above or below the image in the content web part. It would not replace the requirement of including alt text as part of the image definition.