

If image sizing for web pages seems to be an area that confuses you, this blog post is for you.
Automatically Optimize Image Sizes (Excerpted from the SchoolMessenger built-in help about image resizing.)
Many images that you wish to use on your site are much larger than is necessary. For example, depending on the specifications of your phone and the settings used, an image taken on your phone could be well over 10 MB in size. That’s great if you want to print your photos or if you plan to have the image displayed at a very high resolution, but it is far larger than you will ever need for displaying images on your site.
As a result, when you do add one of these massive images to a page on your site (or to a Banner portlet) you end up telling the browser to display the image at a much smaller size. Not only does this make your page unnecessarily large and therefore slower to load, particularly for users with a slower internet connection, but it can also result in images that look worse than they should because the browser is compressing them on the fly. Also, if an image is resized disproportionally, people in the image may appear to be squashed or stretched very thin. Images without people are also distorted but are not as obvious.
Banner Images Are Resize Based on the Banner Area Width
All banner images (used on the home page of school sites) that are wider than the banner area are automatically resized to the width of the banner area currently set to 680 px. The web platform tries not to distort images. It, therefore, resizes the image height proportionately using the same ratio used to resize the width. This may mean that the resulting image is either too tall or too short for the recommended banner height. This can result in the rest of the page below the banner jumping up and down as the banner images of different heights are rotated. This effect would be extremely annoying for most site visitors.
If the image is too tall, you should try to resize the image by cropping less important parts of the top or bottom of the image so that the final size is correct. How can you calculate the height your original image should be? Use the following ratio.
![]()
Thus if the original image is 1360 pixels wide, you should try to crop the top or bottom (or both) so that the original image is 610 pixels. Then after resizing by 50% in each dimension, the image size will be perfect.
Smaller Images
If your original image is less than 610 pixels high, you may need to add additional pixels at the top and bottom to ‘grow’ the image to 610 pixels high. In many graphics programs, this is easily accomplished by resizing the ‘canvas’ on which the picture is placed while centering the picture on the new canvas. If you are starting with an image that is not at least 680 pixels wide, first determine the appropriate height of that original image using the above equation. Then either crop or ‘grow’ the height of the image based on that calculated value. Finally, resize the entire image proportionately so the width is 680 px. You will discover that the resulting height will be 305 px, just perfect for the banner.
NOTE: Enlarging small images to larger images dimensions can result in the pixilation of the image that generally is not attractive for a web page. If possible, always start with a larger image.
Resizing images for the other content areas is a bit more complex, but not significantly different. First, remember that photos from a digital camera or even a modern cell phone are often significantly larger than 680 pixels wide. While you can upload a larger image to the Image Manager and then use the width and height properties to resize the image for display on the page, this practice is strongly discouraged. It requires that larger images must be transferred to the user’s browser to be resized. This increases the bandwidth needed to transfer data and the time needed to resize the image and display the page. Rather, determine the image size you need first and then resize the image using the techniques described above before uploading the image to the Image Manager.
Note: Yes, the Presence system does have a way to ‘resize’ images automatically that you upload to the Image Manager. However, the resizing of the image is based on the size of the uploaded image (images below the specified size are not resized) or allows you to determine the maximum height or width for the resized image. Presence then resizes the image proportionately so that the larger of the two image dimensions will be limited to the specified resized dimension. Suppose we set the Resized Dimension to 600 pixels. For an image having a large width, Presence resizes the image’s width and height proportionately to fit in a 600-pixel wide area. On the other hand, if you had a very tall image, Presence will resize the image’s width and height so that the resulting image is no more than 600 pixels high. The image width now may be too narrow.
We have therefore decided not to implement this feature at this time and leave it up to the web editor to control their image sizes manually.
Upload All Images Used to the File Manager
Another thing I have seen all too frequently is that many web site editors simply try to cut and paste images to a page. This practice at first glance may appear to work because the image appears to display within the content area. However, it uploads the entire image as a binary string of characters that looks something like the following when you attempt to edit the HTML of the content area:
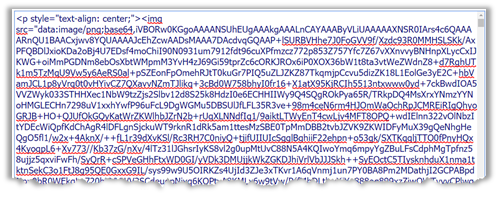
This binary string of characters representing an image can actually extend for hundreds of lines within the editor. This leads to several concerns when editing the page.
- Images directly loaded onto a page cannot be reused easily on other pages unlike images stored in the File Manager.
- The binary string representing the image must be interpreted by the user’s browser and reassembled into an image before displaying the page.
- Unlike images stored in the File Manager, binary strings that represent images are not cached resulting in it taking more time to retrieve and send images to the user’s browser each time the page/image is displayed.
- Typically, page editors do not add the required alt-text to images that are cut-and-pasted onto a page. The web editor (you) must do this manually. (All images must have an ‘alt’ attribute.) While alt attributes can be added after the fact, finding the start and end of an image element that appears as a binary string can be difficult, especially when there are multiple images on a page.
- If there are multiple images consisting of binary strings within a single content area that were inserted by cut-and-pasting of the image, any editing of that content portlet will become more difficult.
How to upload an image to the Image Manager
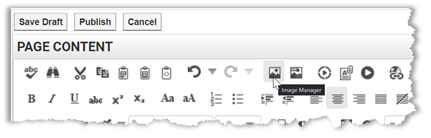
When in a content portlet, use the Image Manager to upload or select a previously uploaded image.
Within the Image Manager first navigate to the folder where the image you want to use has been saved (or if you need to first upload the image, to where you want to save that image). If you are uploading a new image, click the Upload open in the menu bar.
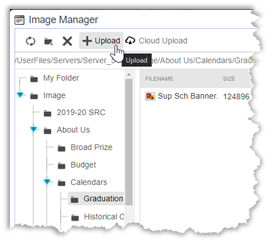
The resulting dialog allows you to select the image from your local drive and upload it. If you find that you need to replace an image with an updated version of the image, it must be uploaded with a ‘new’ name (just add a number to the end of the name). This, of course, requires also that the link to the image must be updated to the new name. When using the Image Manager, it updates the filename automatically for you.
How to Use an Image from the Image Manager
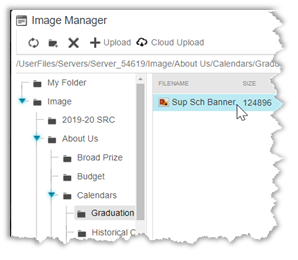
Place the cursor in the Content area where you want to insert the image. Then click the Image Manager icon from the edit menu as described above. Next, navigate to the image you want to use and double click the image name.
You will have to specify the Image Properties before inserting the image. Note that while you can resize the image here, I recommend that you resize the image before uploading it using a photo/image editing program. Then use the width property here should be limited to defining the photo/image width as a percentage of the content area where you will place it (See 1 in the image below). For example, to make an image half with the width of the content area, enter a width of 50%. You must include the percent sign. Only change the Width property. As long as the Width and Height are linked as shown in the image below, the program calculates the Height value for you. By doing this, the image will automatically resize for different devices such as computer screens, tablets, and cell phones.
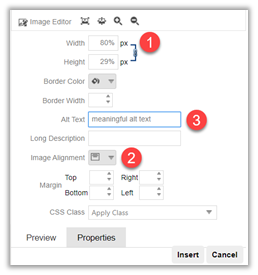
You can also define the image alignment (2) with respect to other text in the content area. Centering the image is preferred in most cases to make it easier for screen readers to read the text properly. However, right or left justifying the image while wrapping text around the image can also work quite effectively.
Finally, remember to include alt-text (3) or the SchoolMessenger Image Manager dialog will not allow you to insert the image. This means that if the image is purely decorative (does not add to the understanding of the other text on the page), you must still provide a default alt-text string and then manually change that alt-text to [alt=””].
Warning: Subsequent editing of the image properties can reset the image attributes to [title=”null”]. This is wrong according to ADA guidelines and must be manually reset in the HTML to [alt=””].